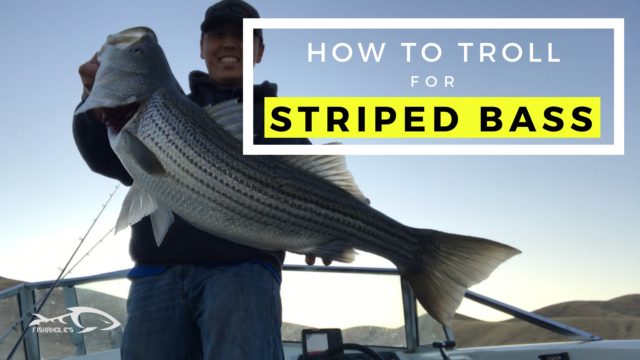
How To Troll For Striped Bass
Trolling for striped bass wasn’t always fun. In fact it was boring. I hated waiting for a striper to bite.
Once I understood how and why I was catching these stripers, it wasn’t just fishing anymore it became a hunt. My catches have been more consistant since I put more effort into trolling for striped bass. In this post, I’m going to show you how I troll for striped bass.
I’ll be going over several things in this post. My goal is to bring you up to speed about trolling so you can be the better angler. I should be your baseline.
Here are a few things I’ll be going over:
What gear I use
Type of rig or lure I use
How to determine the depth of your rig
The importance of speed and what you can do to troll at slower speeds
How to use your fish finder to spot stripers
HOW TO GET STARTED
I don’t have fancy or expensive gear. I wish I did but I don’t. The cheap stuff I have has caught me hundreds of fish this past year and it doesn’t cost you an arm and leg.
GEAR
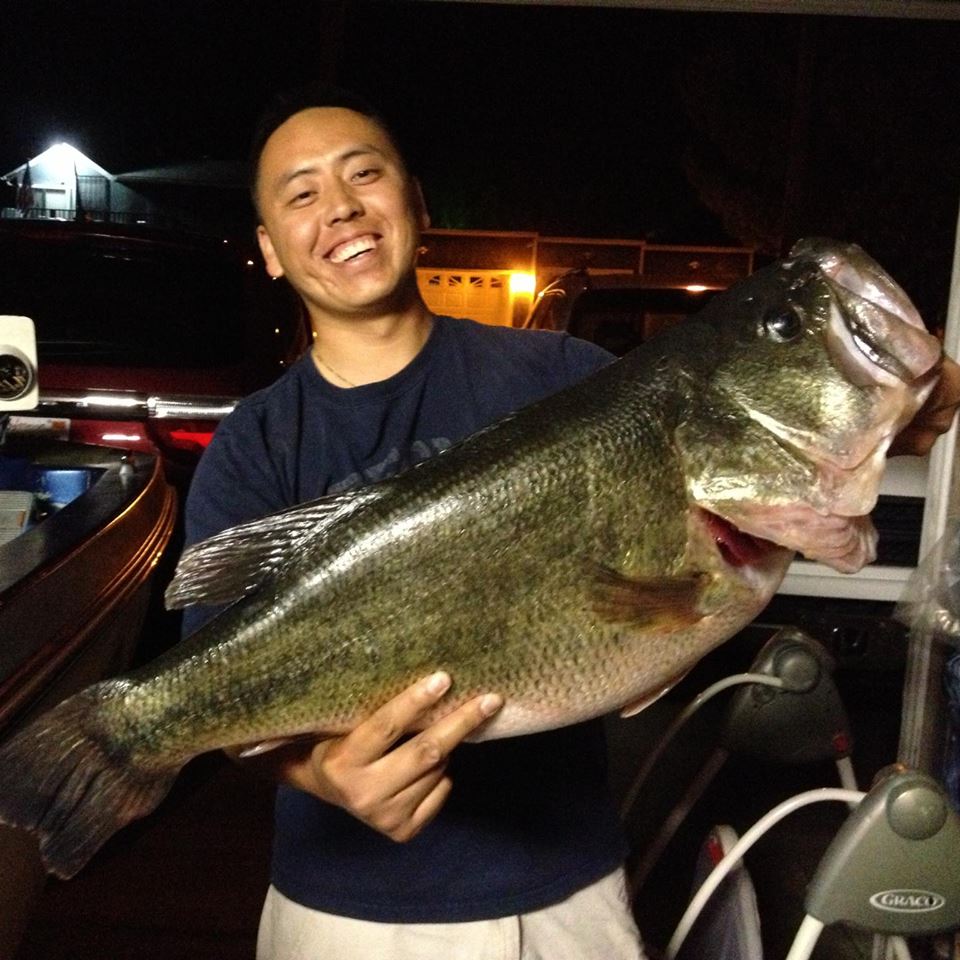
I use an 8’6″ medium heavy Daiwa Wilderness rod which you can find on Amazon for about $20. It’s a great durable rod for the price. You can buy the same rod that I have HERE.

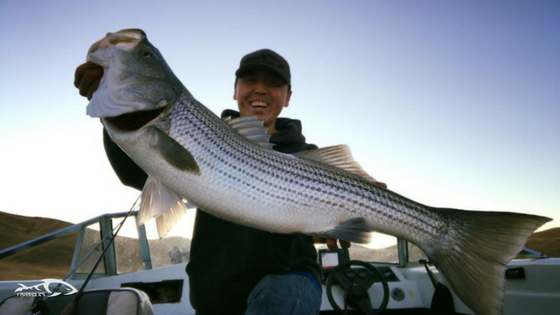
This particular rod is similar to an ugly stick but a tad bit stiffer. It flexes nicely at the tip and has the backbone for pulling in those big fish. This fish was caught using the Daiwa Wilderness.
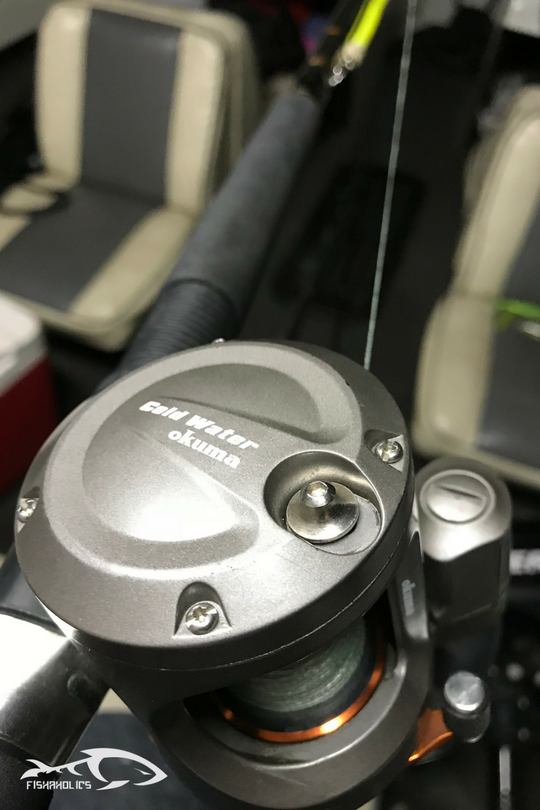
I pair the Daiwa Wilderness with an Okuma Coldwater line counter reel. You can find the exact reel HERE. A line counter is a must when you want to stay consistent but beware, the counter loses its accuracy when your spool is low on line. I’d recommend keeping the spool near capacity to avoid displaying the wrong values on the counter.
As much as I love my Okuma Cold Water reel, I’ve been having issues lately with the gears inside not engaging properly. You may want to check out a different brand but the Cold Water has caught me countless fish in the past.
So, with a rod and reel combo in the low $100 range you’re ready for some trolling.
LINE
I’ve tested out both braid and mono over the years and I like both. I use 30lb Power Pro which you can find HERE for braided line.
For mono, I like to use 30lb Berkeley Trilene Big Game. It’s a pretty sturdy mono line and holds it’s weight well.
I love using braid for casting. The instant hook sets and sensitivity is great. There’s literally no stretch when using this line which can create some problems when trolling.
The impact from the fish striking on your umbrella rig or lure while the boat is moving creates such a force that it can pop the hook off the striper or even rip it right out of its mouth.
When using braid, it’s important to use a rubber snubber. You can find the ones I use HERE. The rubber snubber will absorb most of the shock when a fish strikes. You can also join the braided line with a mono leader which can also act as a shock absorber.
TACKLE
You’ll find catalogs full of potential lures, swimbaits or rigs to fish with but I’ll narrow this down to what’s worked for me in the past.
Umbrella Rigs
Umbrella rigs are by far one of the most effective rigs I’ve used for catching striped bass. Stripers feed off schools of bait and one thing that mimics a bait ball greatly is an umbrella rig.
A quick google search and you can find an assortment of umbrella rigs. One I use regularly are the Tackle Builders Collapsible Atlas Umbrella Rigs. Which can collapse for easy storage.
You can find the Tackle Builders Atlas rigs HERE.
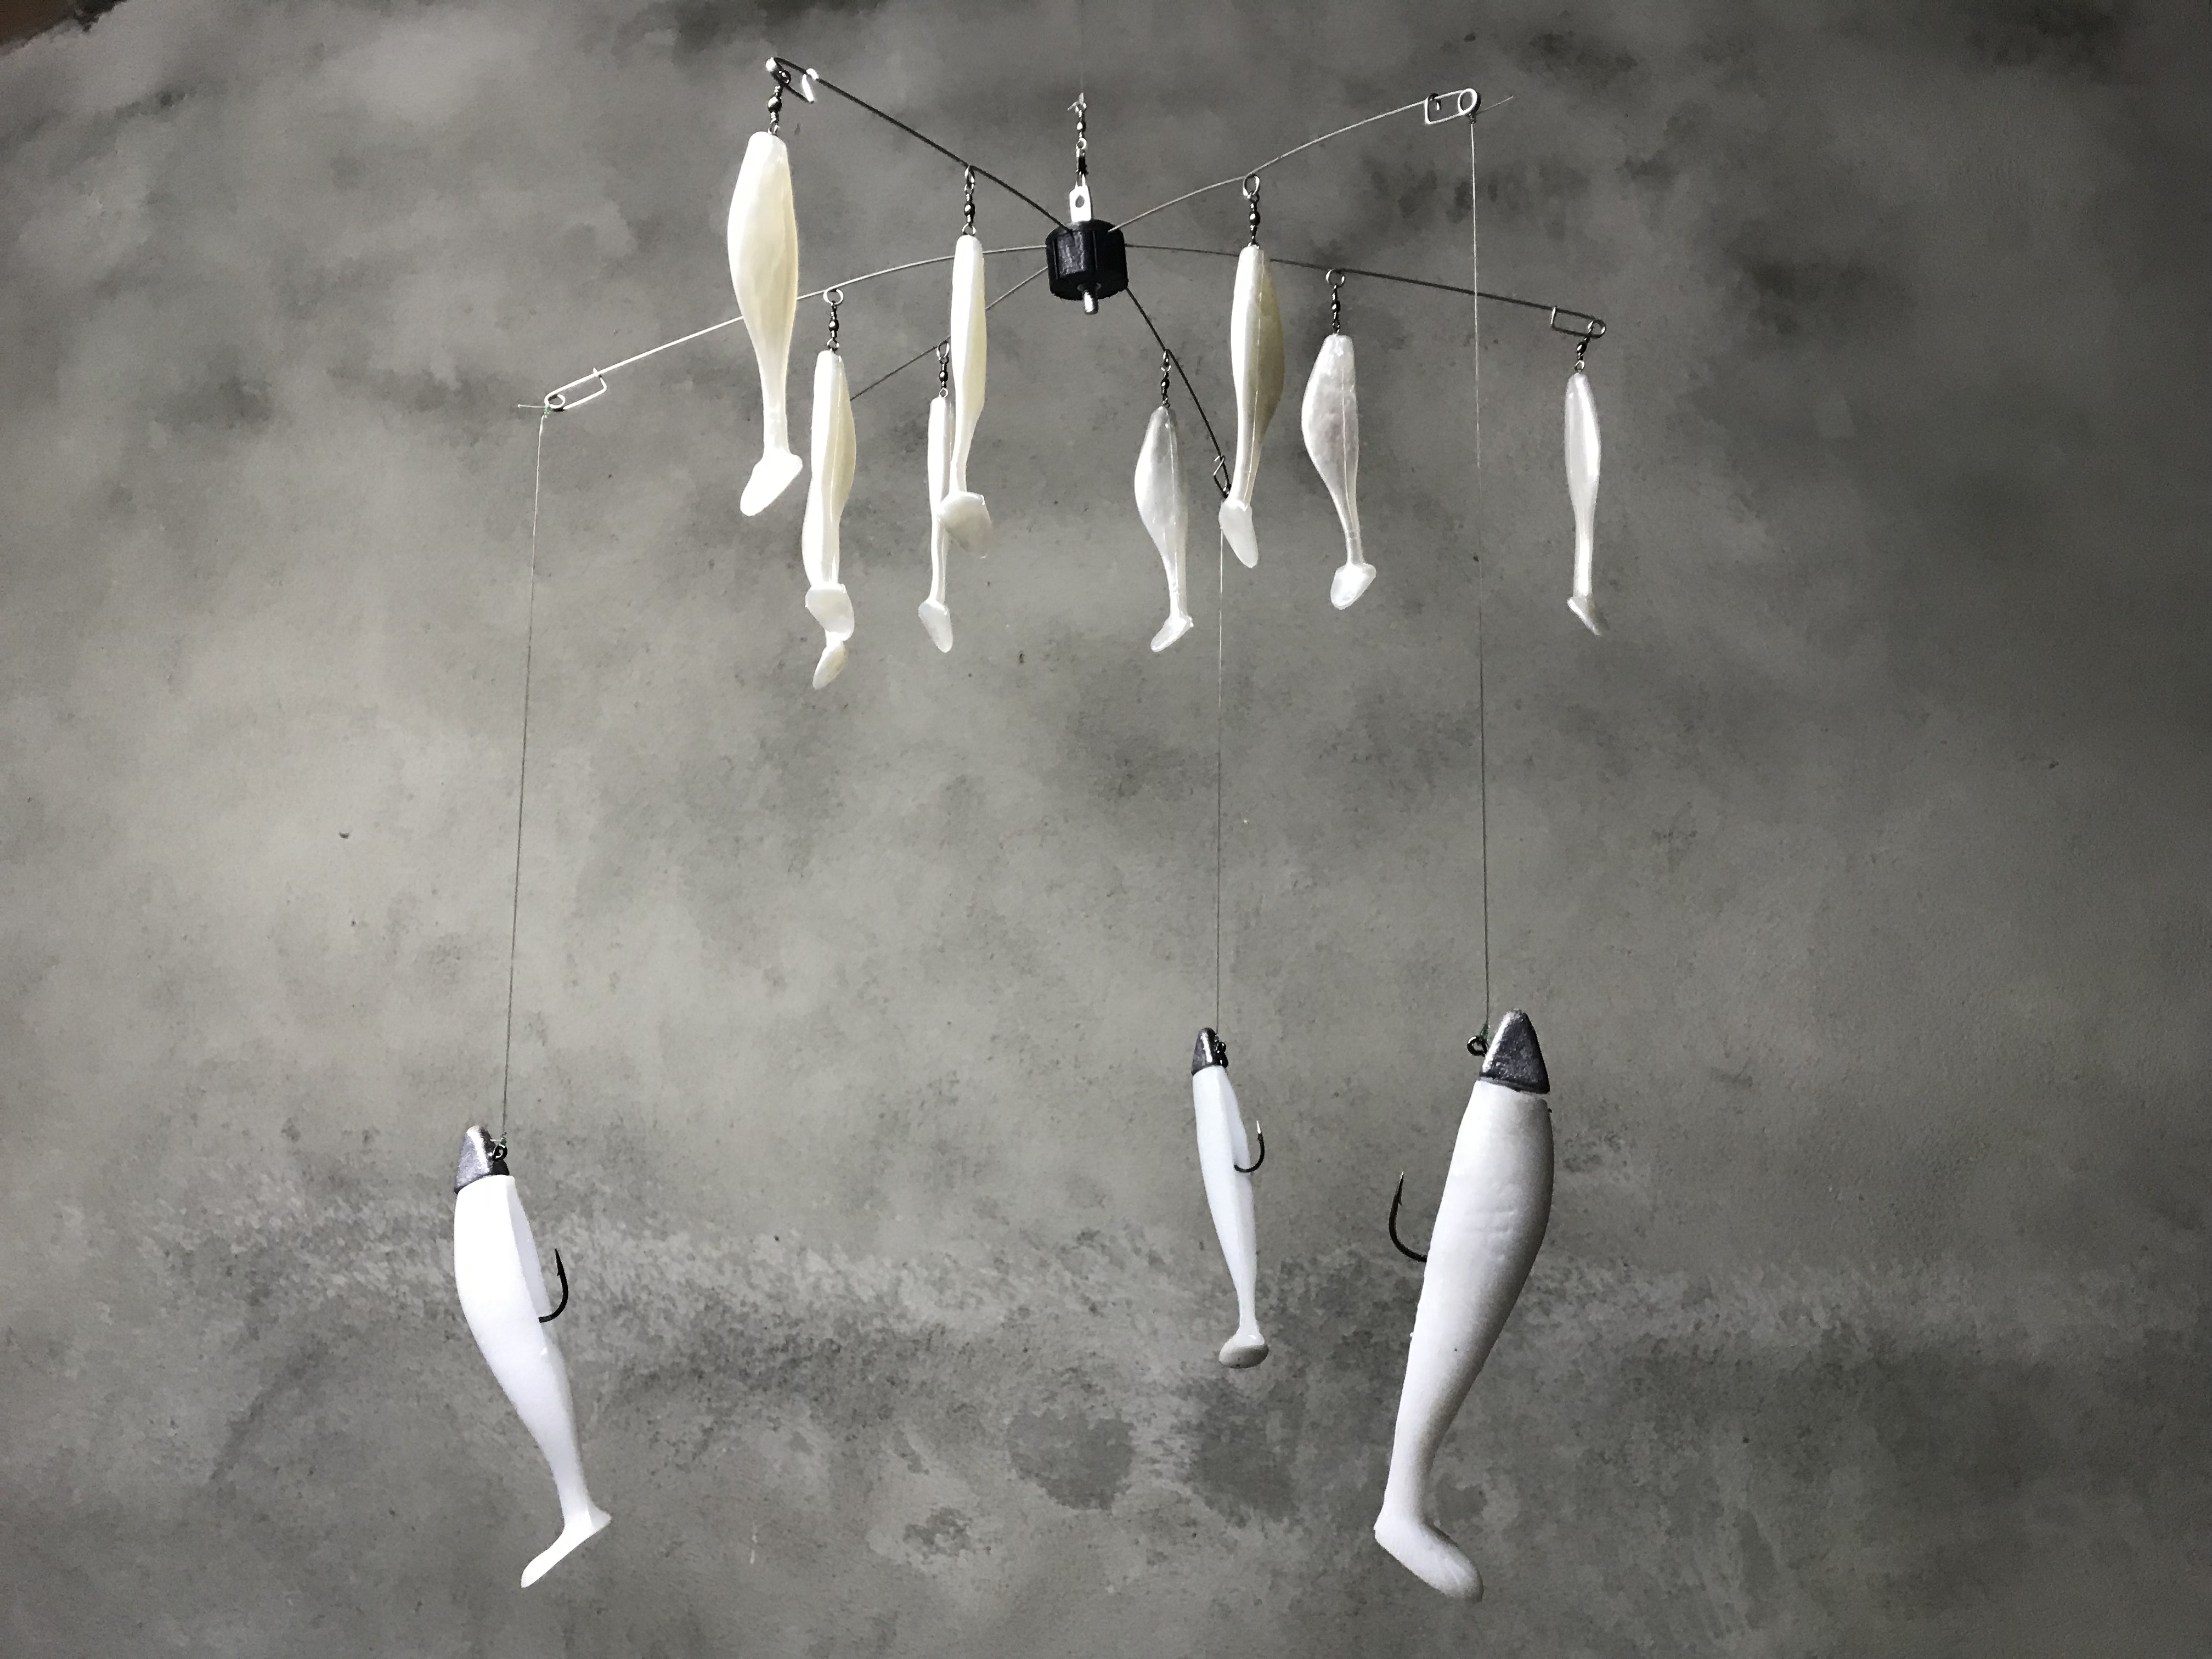
With the Atlas umbrella rig I know exactly how deep I am when trolling because the depth charts are provided HERE. That’s key when you want to fish the bottom and not get hung up or when you want to troll right through a school of fish at a target depth.
Swimbaits
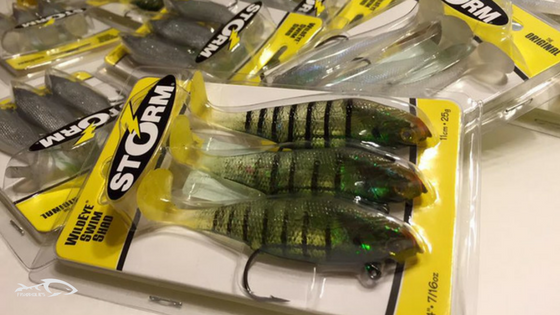
I like using the storm wildeye swimbaits because they’re affordable and they work! Plus they have a good selection of colors.
I’ve been using the Optimum Baits Bad Bubba swimbaits paired with a 1oz jighead a lot lately. Especially on the Atlas rig. These swimbaits last a while. I’ve had one on for three straight trips and it must’ve caught over 20+ fish alone. Other than some minor wear and tear and teeth marks, it’s still usable and swim action hasn’t changed.
Lures
When using lures, I like a slower wobble. SpeedLure 130’s do just that. If you can’t find SpeedLures, LuckyCraft Pointers work well too.
I usually switch to lures when I notice I’m getting short strikes. Having a lure on will increase your hookup ratio when you get a short strike.
If they’re short striking your lure, you’ll notice fish that are caught outside the mouth or head somewhere. You can see exactly what I’m talking about in the youtube video I made below.
How to determine depth
Depth is affected by many factors: speed, line diameter, type of rig, etc. This is one of the most important aspect to trolling and yet most trollers have no clue how deep they’re trolling. Here are two ways you can determine how deep your rig is.
Find a flat level stretch of water with a muddy bottom at the approximate depth you’d like to troll. Maintain the boat at your trolling speed and start letting line out in short increments so the rig doesn’t drop straight to the bottom.
Keep letting line out until you feel the rig bouncing. Reel up a few cranks and wait a few seconds to see if you still feel it dragging on the bottom.
If you no longer feel it dragging, you’re hovering just above the bottom. Now you have an idea how deep your rig is with respect to your speed, line weight and line count.
This method still leaves room for error so below is my preferred method.
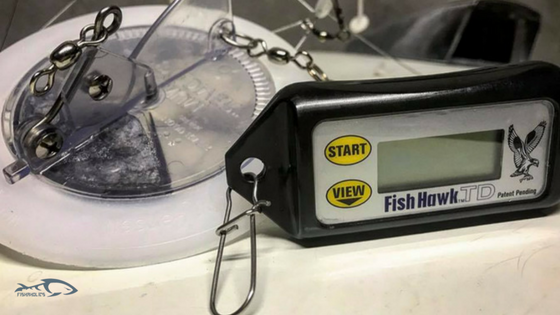
A more accurate way to measure depth is using a device called a Fish Hawk. You can find it HERE. It’s a device that’s used for measuring temperature at several depths. One reason why I like the Fish Hawk so much is its ability to measure maximum depth.
You can make your own depth charts using the device and that’s exactly what I’ve been doing for my downrigger and the Atlas rig. Below are depth charts for the Atlas rig going 2.5mph and 3.0mph using 30lb mono.
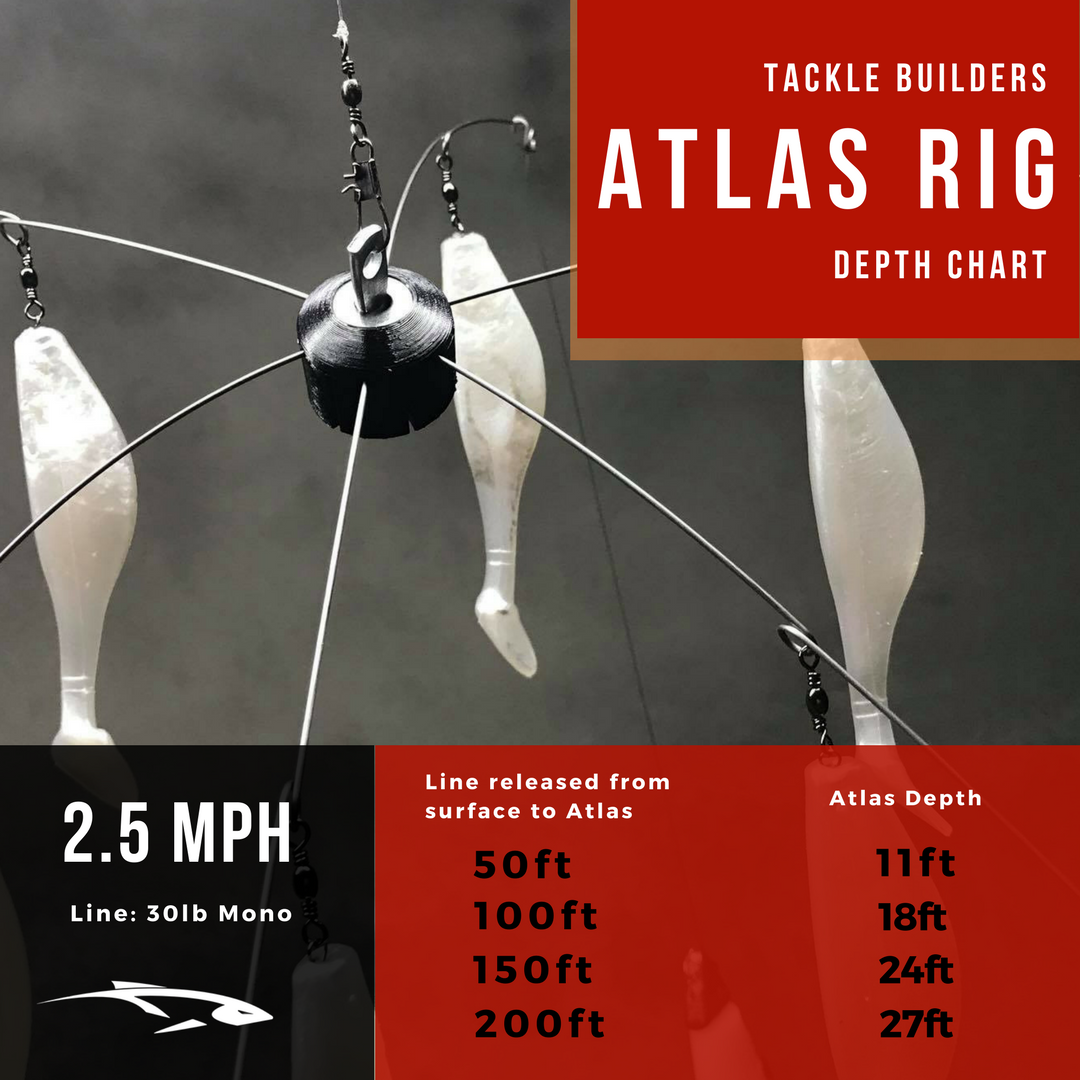
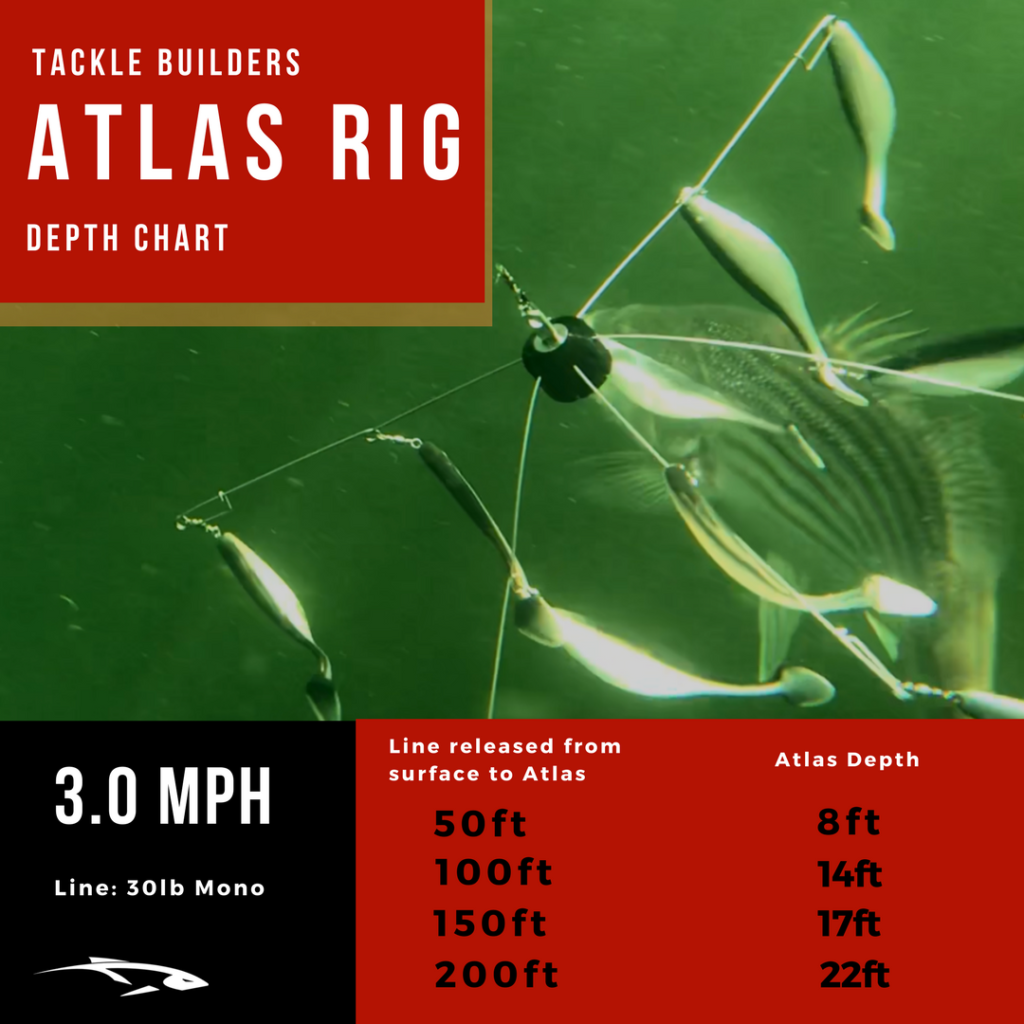
It’s important to note how much line you’re letting out, that’s why a line counter is so important. If your reel doesn’t have a built in line counter, you can purchase an external one that works just the same.
I use the Berkeley line counter from time to time and it checks in with what my line counter on my reel shows.
Knowing how deep you are, you can target fish with accuracy and precision. You’ll know exactly how deep you are and you can repeat that at any water depth.
SPEED
A lot of trollers use their main motor for trolling which can cause them to move too fast without some modifications. A default speed I like to start off with is 2.5mph. Since the bite can vary from day to day, that’s a good speed to gauge how the bite is that day.
If you can’t get your boat to slow down, you can try one of the following.
Trolling Bag/5 Gallon Bucket
The easiest way to slow down without any modifications to your boat is to pull behind your boat a 5 gallon bucket or buy a trolling bag. I used the 5 gallon bucket for a while and it slowed me down another 0.5-1.0mph.
It can get problematic when reeling in your catch if the fish wraps itself around the rope holding the bucket. Plus pulling in the bucket when I want to move to a new spot becomes cumbersome.
One time I even forgot to pull in the bucket and almost lost it when I sped up the boat.
Changing Propeller
Changing your prop can slow you down. This is something I did as well. The prop I had on was more suitable for skiing. The slowest speed I could get was 3.5mph.
I needed a new one anyways so I bought a smaller diameter prop. I was able to slow down to 2.5mph but I lost top end speed and it took a little longer to plane out. It wasn’t an issue for me since I didn’t fish tournaments where time was a factor.
Trolling Plate
You can also use a trolling plate like this one HERE. I’ve never used one before but I’ve been on a boat with one and it can slow you down below 2.0 mph. The good thing about using a trolling plate is you don’t have to constantly pull it back out when you want to move to a new area.
Throttle the boat higher and it pops the plate out allowing you to move along like normal. You do however have to raise the trim and pop the plate back in position when you want to troll again.
Kicker Motor
The best alternative to achieving slower speeds is to use a kicker motor. Having one also prolongs the life of your main motor because you’re not using it for trolling.
I have a Mercury 2.5hp 4 stroke kicker motor. It performs above expectation on my heavy 19’ fiberglass deep V boat. I can cover speeds of 1-4mph plus it saves on fuel.
To mount a kicker motor on, you need to buy a mounting plate for the stern of the boat. You can find the same one I use by clicking HERE. Installation is simple with only 4 bolts for mounting.
Speed Conditions
I’ve explained different ways to slow down your boat. Here are speeds I’ve used in different conditions.
If fish are more active, I tend to use higher speeds from 2.5-3.5mph. They want a faster moving prey since they’re actively chasing bait.
When fish are less active I slow it down to 2.0-2.5mph. I go below 2.0mph if the bite is tough.
It’s good to test various speeds throughout the day since the bite can change on the hour. Most of my catches have been in the 2.0-3.0mph range.
HOW TO SPOT STRIPERS USING YOUR FISHFINDER
I use a Humminbird 598ci HD fishfinder which is now a discontinued item but you can get a similar model HERE. What’s displayed on my screen may vary from other brands or even models. It’ll take more than this post alone to detail everything about spotting stripers on your fish finder so I’ll explain some of the more common ways to spot them and show some examples below.
Knowing the body of water you’re fishing is important. Fishing a place like the California Delta will be harder for you to distinguish between a striped bass vs other species.
One way to determine if its a striper is to go by behavior. We know striped bass like to school up so a good way to tell is by finding arcs that are clustered together.
After spotting a school, I’ll troll right through it. This can create two types of strikes: a hunger strike or reaction strike.
If I don’t get anything on the first pass, I’ll make another at a different depth.
I’ll change colors, vary the depths, change speeds or change lures to get them to bite. If I get no takers, I’ll move on. Stripers have a small window of opportunity where they’ll bite sometimes. When there is no interest, it’s likely you hit the school at the wrong time.
It may also just be a different type of species that school up like carp. So mark the spot and come back to it at a later time and find new areas to fish.
Sometimes, I skip looking for striped bass altogether. I’ll look for bait fish like shad. Shad balls show up as yellow/orange clusters. Usually when I find these bait balls, I’ll troll right through them. If there are active stripers nearby, they’ll surely strike at your rig.
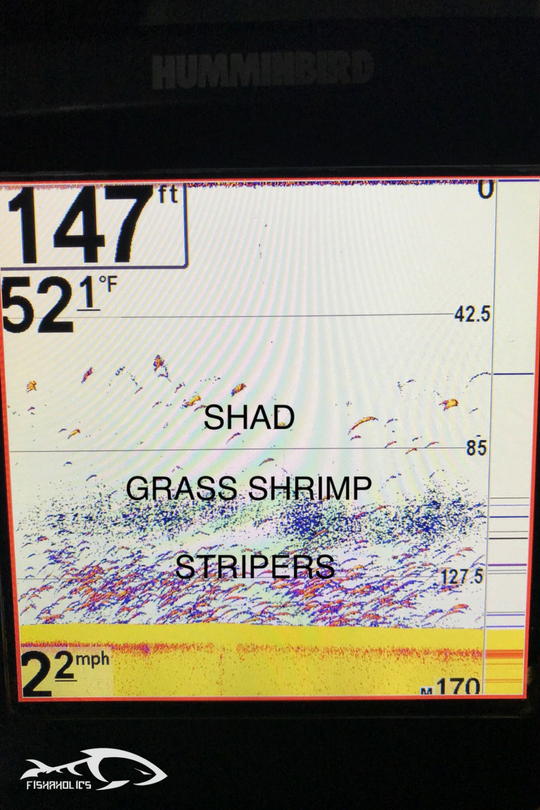
Above is a shot showing stripers underneath a massive school of grass shrimp and above the grass shrimp, scattered schools of shad. Grass shrimp don’t have air bladders like fish do so they’ll have a weaker return which show up as blue on my screen.
The scattered shad balls around the 50′ depth show up better because they’re clustered so close together all those little air bubbles inside the shads air bladder act as one which give off a solid return.
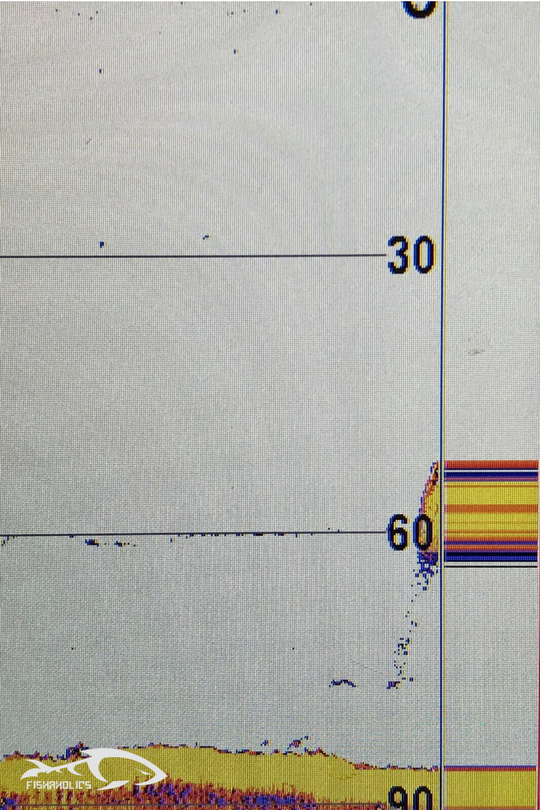
Here’s a shot showing active stripers 84′ down. You want to look for vertical arcs more than horizontal arcs. Vertical arcs show that they are active and moving up and down in the water column.
These are good indications of active fish. When you spot horizontal arcs, striped bass are stationary and less active. Doesn’t mean you won’t catch any stripers but an area with more vertical arcs will increase your odds of catching fish.
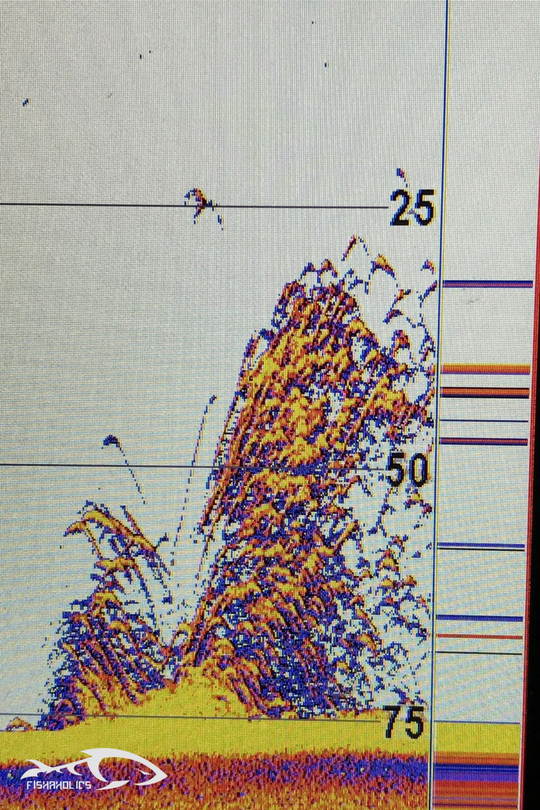
In this shot, I was able to capture part of a shad ball. Notice how it’s mostly yellow and orange in the middle.
That’s where it’s the thickest and concentrated. This makes it easier to spot shad balls. You can see some stripers in the 80′ depth and bottom chasing the bait.
When you find shad balls, stripers are sure to be in pursuit. Try trolling at all depths: above the bait, right through them or below them to see what depth works.
If you don’t catch fish after trolling through something like the picture above, you’re doing something wrong.
This is a massive school of VERY active striped bass from the bottom all the way to 25′ of water. That’s a school 50′ deep that stretches 150-200′ long. Crazy how many stipers there were in this area. This shot was taken at San Luis Reservoir by the way.
These are just some of the screen shots I’ve been collecting over the years. Of course, stripers will relate differently in different bodies of water, around structure or cover, in the summer or winter, etc.
Put some time on the water and you’ll soon discover what to look for when fishing your body of water.
BONUS TIPS WHILE TROLLING
Create Some Action
When you’re trolling, change the action of your rig once in a while. You can simply pull the rod tip up or to the side and let the line slack for a second or two. It may not seem much but this change in action can entice a bite. Sometimes stripers will follow your rig and that slight change is all it takes for a hookup. Everyone should be doing this while they’re trolling.
Adjust Depths
When your trolling, try different depths. Fish can be anywhere. If you have multiple rods out, have one at a shallower depth and the other at a deeper depth. Which ever one gets bit first, start trolling at that depth. Stripers will relate differently throughout the day so always try new depths.
Drag Your Umbrella Rig On The Bottom
Drag my umbrella rig on the bottom Meng? What if I snag it? Well, I thought the same until I started catching fish when I raised my Atlas rig off the bottom after being dragged. It won’t work at all locations.
You minimize snagging by trying this in areas with a flat muddy bottom. You will snag in areas with brush and rocks so know your lake bottom well before attempting.
The arms of the umbrella rig act as a weed guard in a way reducing the amount of debris from catching onto your swimbaits. A lure with treble hooks will easily snag on debris but using an umbrella rig minimizes this.
Dragging your umbrella rig on the bottom also kicks up dirt and debris which attracts stripers in the area. They’ll give chase and sure enough when you raise the rig off the bottom, it looks like bait fish trying to escape and that’s usually when you’ll get your strikes.
Not many anglers try this because they fear losing their rigs but it’s a method that’s produced countless stripers for me.
Trolling is one of those techniques where you can cover alot of water while finding active striped bass. Like any other technique, you must put in the time and hone in on the tiny details that make it work before you become consistent.
Like any new fishing techniques, it won’t come easy at first. I almost quit because I wasn’t getting the results I wanted. Once I put in more time and effort, I became more consistent.
It’s not a technique that creates excitement like a striper exploding on your top water lure or the blind strike and pull from using a jerkbait but trolling is one technique that’s consistently produced for me in the past.
Who doesn’t like catching fish. Trolling will help you catch more stripers more often.
Let me know what’s worked for you in the past in the comments below. Please share this post with your fishing buddies using the social media icons below.
Now you know. Go get em!
You can find the same gear I use using the affiliate links below.
–Okuma Cold Water line counter reel
–Daiwa Wilderness Trolling Rod
–TackleBuilders Atlas Umbrella Rig
Get on it guys and girls… it works!!!
Get on it guys and girls!!! It works great!!! https://uploads.disquscdn.com/images/ac851b594faaca752b929fa3a99d979127b3d419264d152f187df36fbb3cadcd.jpg